Branded rewards let cardholders earn value at a merchant and spend it there on later purchases. Follow this walkthrough to authenticate, present and activate an offer, submit a purchase, handle reward outcomes and display merchant balances. You can build the wallet interface yourself or use the optional SDK linked at the end.
Percents provisions your issuer API credential and provides it securely. Keep it on your server and include it in every API request:
Authorization: token <tok_id>:<api_secret>| Environment | Host |
|---|---|
| Testing | https://sandbox.percents.com |
| Production | https://prod.percents.com |
Replace <env-host> in this guide with the correct host and use the credential for that environment. See API authentication for setup and access requirements.
You can register cardholder accounts first, or let Percents create missing accounts when it receives a new external cardholder or card ID. This guide uses lazy provisioning. A cardholder group holds rewards for one cardholder or several who share an account.
Save lazilyProvisionedAccounts when returned. It maps your internal IDs to Percents IDs and contains only accounts created by that request. Use the group mapping to connect webhook data.cardholderGroupId to your customer.
For testing, use the sandbox merchant setup. Keep its matching override out of production.
Read general offers:
GET <env-host>/api/v2/offersChoose a live offer with rewardProductType: branded_balance and activationType: CLICK. Show its rate and terms to the cardholder. Use its actual offer ID in step 2.
Request pages with page and pageSize. Continue while hasNextPage is true. Stop if no suitable offer is available. The offer guide explains offers for a specific customer after accounts have been registered.
The purchase in step 3 must be at the selected offer's merchant and meet its dates, activation requirement and terms. Selecting an offer alone does not make a purchase qualify.
After the cardholder clicks the offer, send the click to the activity endpoint:
POST <env-host>/api/v2/cardholder/external/issuer-cardholder-001/user-activity{
"events": [
{
"eventId": "issuer-activity-001",
"offerId": "mpo_66666666-6666-4666-8666-666666666666",
"occurredAt": "2026-07-01T18:41:00.000Z",
"type": "CLICK",
"clickFlavor": "ACTIVATE"
}
]
}- Use the time of the real click. Do not send a click just because an offer was displayed.
- A new cardholder gets
201 CreatedandlazilyProvisionedAccounts. Save those ID mappings. - An existing cardholder gets
204 No Content. This call does not need or create a card.
This example uses CLICK. VIEW offers accept clicks or qualifying visibility events. PASSIVE offers need no activation. Still report observed views and clicks for engagement measurement. Branded ONE_TIME offers use merchant activation.
When the purchase settles, send the purchase and card details:
POST <env-host>/api/v2/incoming-txn{
"id": "issuer-txn-001",
"amount": 5000,
"currency": "usd",
"merchantDescriptor": "Example Coffee",
"merchantId": "processor-merchant-001",
"mcc": "5814",
"createdAt": "2026-07-01T18:42:00.000Z",
"authTimestamp": "2026-07-01T18:41:30.000Z",
"cardholderId": "issuer-cardholder-001",
"cardId": "issuer-card-001",
"cardLast4": "4242",
"cardBIN": "411111",
"physical": true,
"billingZip": "10001",
"network": "visa",
"authMethod": "contactless",
"authCode": "123456",
"arn": "12345678901234567890123",
"state": "settled",
"merchantAddressStreet": "123 Main Street",
"merchantAddressCity": "New York",
"merchantAddressState": "NY",
"merchantAddressCountry": "US",
"merchantAddressZip": "10001",
"merchantLat": "40.7128",
"merchantLong": "-74.0060"
}Replace the sample values with actual event times and purchase details:
5000means $50.00 USD.- Use the same external cardholder ID as step 2.
- Keep the purchase ID when retrying the same event. Use a new ID for a different purchase.
merchantIdis the network or processor's ID, not a catalogmp_ID.- Include the original authorization ID as
externalAuthIdwhen you sent that authorization.
For shared accounts, follow the group identity rules.
Save any new lazilyProvisionedAccounts mappings. See the settlement reference for required fields and additional purchase details, and refund and dispute reporting for later events.
Send authorizations if real-time notifications and updates are a requirement. Use the resulting estimates for early customer feedback and the settlement result for the actual reward. See the reward lifecycle for details.
A qualified_settlement webhook reports earned merchant value, available branded balance spent on the purchase, or both. A purchase can spend balance without earning a new reward.
Display the reported earned reward for the customer identified by data.cardholderGroupId, using your saved group mapping. Earned value may become available later. See the branded lifecycle for more details.
If spend is present, apply spend.amountMinor as a customer statement credit once per data.source.percentsId, the Percents settlement ID.
For the $50 purchase submitted as issuer-txn-001, suppose the cardholder has $1 of eligible existing merchant balance. Spending that $1 leaves $49 eligible to earn at 500 basis points (5%). The result is $2.45 of new merchant value, below the $4 cap, and a separate $1 statement credit for the balance spent.
Webhook excerpt — selected fields from the full branded settlement example.
{
  "type": "qualified_settlement",
  "data": {
    "source": { "externalId": "issuer-txn-001" },
    "reward": {
      "rewardProductType": "branded_balance",
      "currency": "usd",
      "amountMinor": 245,
      "cardholderEarnRate": { "kind": "basis_points", "basisPoints": 500 },
      "maxEarnAmountMinor": 400
    },
    "spend": { "currency": "usd", "amountMinor": 100 }
  }
}
Show the $2.45 earned in the merchant wallet, with its availability timing. Apply the $1 settled spending as a customer statement credit. A cardholder without an eligible existing balance receives no spend field and no spend credit.
See webhook setup and delivery for receiving these notifications.
Only qualifying outcomes produce a notification. If a result is missing, look up the purchase using your original purchase ID. Follow the branded webhook guide for later clawbacks, balance deductions and issuer debits.
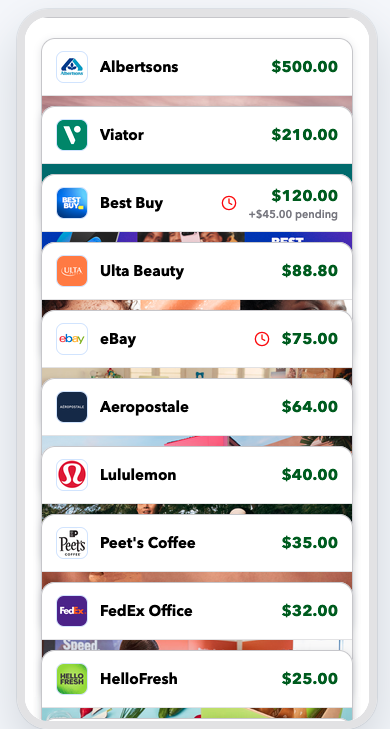
Give cardholders a view of what they have earned, what is ready to spend and what they have used at each merchant. Read merchant balance summaries with GET /api/v2/chg/{chgId}/balances. Use merchant balance details for a closer view of earned, available, spent and expired value.
Show available balance separately from pending value. Refresh balances after reward notifications and when the cardholder opens the wallet. The example below shows merchant cards with available balances and a separate pending amount. It illustrates a possible layout, not live balances or guaranteed merchant availability.
These pseudocode examples show every applicable request field, including optional fields, in seven languages. They are not a Percents SDK and omit imports, HTTP client setup and a web server.
The examples use an internal group ID to keep the cardholder in the same group across activity and purchases. Omit externalCardholderGroupId if you rely on the default lazy assignment. Include externalAuthId when the original authorization ID is available. Supply optional merchant details, authCode and arn from your purchase data when available. Do not invent missing values.
Implement these helpers in your application:
| Helper | What it does |
|---|---|
api | Uses your host and issuer credential. Parses JSON, handles empty 204 responses and stops on HTTP errors or 207 batch failures. |
findOffer | Starts with the URL shown and increments page, keeping pageSize, until it finds a live offer for the selected product and CLICK policy. Stops if there is no match. |
accounts.saveCreated | Saves mappings from external IDs to Percents IDs when present. Does nothing when the key is absent. |
webhook.listen | Delivers events to your handler using the shared webhook setup and delivery rules. |
wallet | Displays offers, earned rewards and merchant balance summaries in your wallet. |
statements.creditOnce | Applies the reported branded spending as a statement credit, once per settlement ID. |
Optional field access (such as optional(...) in Python) returns no value when a key is absent. Helper names follow each language's style. Replace sample IDs and times with real events and percent encode external IDs in URLs.
The settlement handler processes earning and spending. Add the clawback handler from the branded webhook guide for the full refund workflow.
// Authentication: configure api on your server with the environment host and securely provided issuer credential.
const PRODUCT = "branded_balance"

// 1. Present a live CLICK offer. Stop if none is available.
const offer = await api.findOffer("/api/v2/offers?page=1&pageSize=25", PRODUCT, "CLICK")
wallet.showOffer(offer)

// 2. Send this only after the cardholder really clicks the offer.
const activity = await api.post(
  "/api/v2/cardholder/external/issuer-cardholder-001/user-activity",
  { externalCardholderGroupId: "issuer-group-001", events: [{ eventId: "issuer-activity-001", offerId: offer.id,
    type: "CLICK", clickFlavor: "ACTIVATE", occurredAt: "2026-07-01T18:41:00.000Z" }] }
)
accounts.saveCreated(activity?.lazilyProvisionedAccounts)

// 4. Use qualified settlement outcomes to update the customer wallet.
webhook.listen("qualified_settlement", event => {
  if (event.data.reward?.rewardProductType === PRODUCT) {
    wallet.showEarnedReward(event.data.cardholderGroupId, event.data.reward)
  }
  if (event.data.spend) {
    statements.creditOnce(event.data.source.percentsId, event.data.spend)
  }
})

// 3. Send the actual purchase after settlement. Reuse this ID for retries.
// Include optional fields only when available in your purchase data.
const purchase = {
  "id": "issuer-txn-001", "amount": 5000,
  "currency": "usd", "merchantDescriptor": "Example Coffee",
  "merchantId": "processor-merchant-001", "mcc": "5814",
  "createdAt": "2026-07-01T18:42:00.000Z", "authTimestamp": "2026-07-01T18:41:30.000Z",
  "cardholderId": "issuer-cardholder-001", "cardId": "issuer-card-001",
  "cardLast4": "4242", "cardBIN": "411111",
  "physical": true, "billingZip": "10001",
  "network": "visa", "authMethod": "contactless",
  "externalCardholderGroupId": "issuer-group-001",
  "externalAuthId": "issuer-auth-001",
  "authCode": "123456",
  "arn": "12345678901234567890123",
  "merchantAddressStreet": "123 Main Street",
  "merchantAddressCity": "New York",
  "merchantAddressState": "NY",
  "merchantAddressCountry": "US",
  "merchantAddressZip": "10001",
  "merchantLat": "40.7128",
  "merchantLong": "-74.0060",
  "state": "settled"
}
const result = await api.post("/api/v2/incoming-txn", purchase)
accounts.saveCreated(result?.lazilyProvisionedAccounts)

// 5. On wallet open or after a reward notification, use the saved Percents group ID.
const balances = await api.get(`/api/v2/chg/${cardholderGroupId}/balances`)
wallet.showBalances(balances)You can use the optional branded SDK to display offers and wallet balances in your app. The session contract identifies the active cardholder for SDK activity reporting on your behalf. Follow the Branded SDK Quickstart to create a server-side session and mount the components. Your backend still submits purchases and handles reward webhooks.